This is 2 of 8 parts of tutorial series
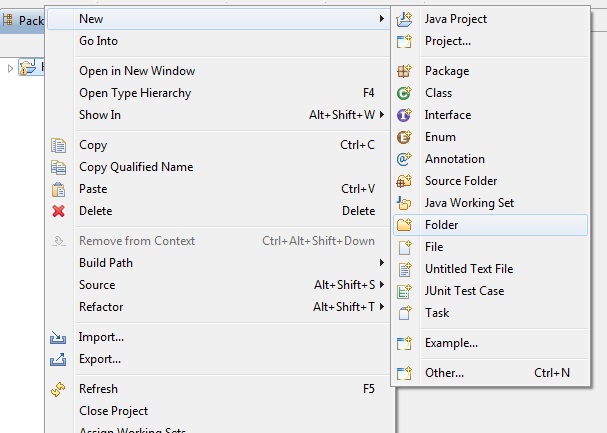
Click on other and then select java project

Click on next and Write project name.I have writtern here "Hibernate4HelloWorldProject"
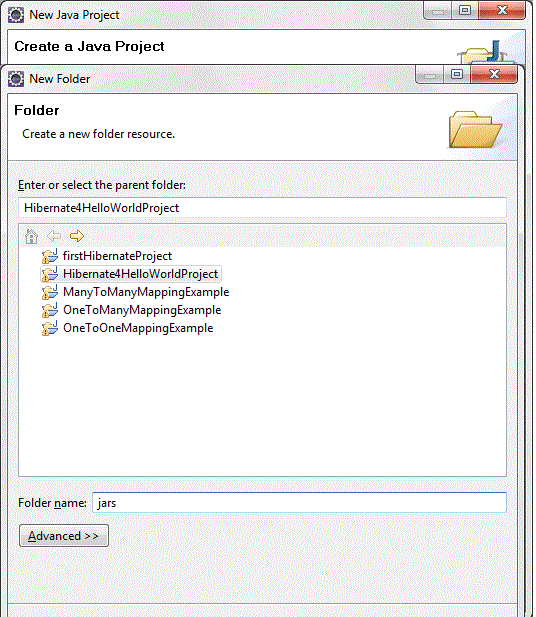
 Write folder name as "jars"
click on finish and empy jar folder will be created in src folder.
Now we will add the hibernate 4 libraries to the project. Extract the "hibernate-release-4.1.9.Final" file if you have not extracted. Now go to the "hibernate-release-4.1.9.Final->lib->required" directory and then copy all the jar files (Ctrl+C) and paste on the jars directory (of our project) in the Eclipse IDE.
Also download jdbc driver for your database and copy that jar to jars
Note- location of above jar files may vary from versions to versions. So if you are using other versions than 4.1.9 then you need to find jars in that version.
Now add all the jars to "Java Build Path". Right click on the "Hibernate4HelloWorldProject" in project explorer and then select properties. Then select "Java Build Path" --> Libraries and then click on the "Add JARs" button. And add all the libraries to Java Build Path.
Click on OK.
you are done with configuring hibernate in eclipse.
Now we will write our first hibernate application.For configuring hibernate in eclipse,please refer previous post.I am using SQL server 2005 as database.
We will create User.java for creating above table in database.
<?xml version='1.0' encoding='utf-8'?> <!DOCTYPE hibernate-configuration PUBLIC "-//Hibernate/Hibernate Configuration DTD 3.0//EN" "http://hibernate.sourceforge.net/hibernate-configuration-3.0.dtd">
<property name="hibernate.connection.url "> :specify JDBC URL to the database instance.
<property name="hibernate.connection.username " >:Specify database username
<property name="hibernate.connection.password" >:Specify database password
<property name="hibernate.connection.dialect" >:This property makes Hibernate generate the appropriate SQL for the chosen database.
<property name="hibernate.connection.pool_size " >:This property limits the number of connections waiting in the Hibernate database connection pool.
<property name="show_sql" >:If you specify this property to be true then all sql statement will be printed to console.
<property name="hbm2ddl.auto" >:It specify operation on your database schema.Whether to drop and recreate your database schema or update current schema.
<mapping class="org.arpit.javapostsforlearning.User" >:Here you need to specify all java classes for which you want to create a table in database.You need to specify all entity classes here.
Tutorial Content:
Part-1:Introduction to hibernate frameworkAfter basic understanding of hibernate framework.We are ready to start working on hibernate In this post,we will configure hibernate in eclipse and write our first hibernate program.For configuring hibernate,there are some prerequisites which you need to have on your system.
Part-2:Hibernate hello world example in eclipse
Part-3:Hibernate one to one mapping example
Part-4:Hibernate one to many mapping example
Part-5:Hibernate many to many mapping example
Part-6:Hibernate inheritance:Table per class hierarchy
Part-7:Hibernate inheritance:table per subclass
Part-8:Hibernate inheritance:Table per concrete class
- Download hibernate framework.(I am using here latest hibernate version 4.1.9)
- Download any database.(I am using here sql server 2005)
- Download JDBC driver for database(I have downloaded jdbc driver for sql server 2005)
- Eclipse ide
- JDK 1.5 or above
Click on other and then select java project

Click on next and Write project name.I have writtern here "Hibernate4HelloWorldProject"
Click on finish and now our project is created
Create new folder "jars" under src folder so for that right click on project->new->folder
 Write folder name as "jars"
click on finish and empy jar folder will be created in src folder.
Now we will add the hibernate 4 libraries to the project. Extract the "hibernate-release-4.1.9.Final" file if you have not extracted. Now go to the "hibernate-release-4.1.9.Final->lib->required" directory and then copy all the jar files (Ctrl+C) and paste on the jars directory (of our project) in the Eclipse IDE.
Also download jdbc driver for your database and copy that jar to jars
Note- location of above jar files may vary from versions to versions. So if you are using other versions than 4.1.9 then you need to find jars in that version.
Now add all the jars to "Java Build Path". Right click on the "Hibernate4HelloWorldProject" in project explorer and then select properties. Then select "Java Build Path" --> Libraries and then click on the "Add JARs" button. And add all the libraries to Java Build Path.
Click on OK.
you are done with configuring hibernate in eclipse.
Now we will write our first hibernate application.For configuring hibernate in eclipse,please refer previous post.I am using SQL server 2005 as database.
We will make User_table table in database using hibernate.
1.User.java(Entity)
An entity can be considered as a lightweight persistence domain object. An entity defines a table in a relational database and each instance of an entity corresponds to a row in that table. An entity refers to a logical collection of data that can be stored or retrieved as a whole.
Create a new package org.arpit.javapostsforlearning to hold the java files. Right click on the "src" folder and then select New --> Package. Then provide the package name as org.arpit.javapostsforlearning and click on the "Finish" button.
Create a new Java file User.java under the package org.arpit.javapostsforlearning and add the following code:
package org.arpit.javapostsforlearning;

import javax.persistence.Column;
import javax.persistence.Entity;
import javax.persistence.GeneratedValue;
import javax.persistence.Id;

@Entity(name="User_table")
public class User {
 @Id
 int userId;
 @Column(name="User_Name")
 String userName;

 String userMessage;
 public int getUserId() {
  return userId;
 }
 public void setUserId(int userId) {
  this.userId = userId;
 }
 public String getUserName() {
  return userName;
 }
 public void setUserName(String userName) {
  this.userName = userName;
 }
 public String getUserMessage() {
  return userMessage;
 }
 public void setUserMessage(String userMessage) {
  this.userMessage = userMessage;
 }

}
@Entity is used for making a persistent pojo class.For this java class,you want to create a table in database.
@Entity(name="User_table") specify that create a table named "User_table" in database
2.Hibernate configuration XML:
After configuring hibernate in eclipse,we need to configure "hibernate.cfg.xml" for database configuration and other related parameters.By default,hibernate searches for a configuration file in a project's root directory.Create a file named "hibernate.cfg.xml" in src folder.<?xml version='1.0' encoding='utf-8'?> <!DOCTYPE hibernate-configuration PUBLIC "-//Hibernate/Hibernate Configuration DTD 3.0//EN" "http://hibernate.sourceforge.net/hibernate-configuration-3.0.dtd">
<hibernate-configuration><property name="connection.driver_class">: Need to specify JDBC driver class.
<session-factory>
<!-- Database connection settings -->
<property name="connection.driver_class">com.microsoft.sqlserver.jdbc.SQLServerDriver</property>
<property name="connection.url">jdbc:sqlserver://localhost:1433;database=UserInfo</property>
<property name="connection.username">sa</property>
<property name="connection.password"></property>
<!-- JDBC connection pool (use the built-in) -->
<property name="connection.pool_size">1</property>
<!-- SQL dialect -->
<property name="dialect">org.hibernate.dialect.SQLServer2005Dialect</property>
<!-- Echo all executed SQL to stdout -->
<property name="show_sql">true</property>
<!-- Drop and re-create the database schema on startup -->
<property name="hbm2ddl.auto">create</property>
<mapping class="org.arpit.javapostsforlearning.User"></mapping>
</session-factory>
</hibernate-configuration>
<property name="hibernate.connection.url "> :specify JDBC URL to the database instance.
<property name="hibernate.connection.username " >:Specify database username
<property name="hibernate.connection.password" >:Specify database password
<property name="hibernate.connection.dialect" >:This property makes Hibernate generate the appropriate SQL for the chosen database.
<property name="hibernate.connection.pool_size " >:This property limits the number of connections waiting in the Hibernate database connection pool.
<property name="show_sql" >:If you specify this property to be true then all sql statement will be printed to console.
<property name="hbm2ddl.auto" >:It specify operation on your database schema.Whether to drop and recreate your database schema or update current schema.
<mapping class="org.arpit.javapostsforlearning.User" >:Here you need to specify all java classes for which you want to create a table in database.You need to specify all entity classes here.
3.Main class:
Create a class named "HibernateMain.java" in src->org.arpit.javapostsforlearning
package org.arpit.javapostsforlearning;As we have discussed in our previous post,we have to create SessionFactory instance in order to communicate with Database in Hibernate
import org.hibernate.Session;
import org.hibernate.SessionFactory;
import org.hibernate.cfg.Configuration;
import org.hibernate.service.ServiceRegistry;
import org.hibernate.service.ServiceRegistryBuilder;
public class HibernateMain {
public static void main(String[] args) {
Configuration configuration=new Configuration();
configuration.configure();
ServiceRegistry sr= new ServiceRegistryBuilder().applySettings(configuration.getProperties()).buildServiceRegistry();
SessionFactory sf=configuration.buildSessionFactory(sr);
User user1=new User();
user1.setUserName("Arpit");
user1.setUserMessage("Hello world from arpit");
User user2=new User();
user2.setUserName("Ankita");
user2.setUserMessage("Hello world from ankita");
Session ss=sf.openSession();
ss.beginTransaction();
//saving objects to session
ss.save(user1);
ss.save(user2);
ss.getTransaction().commit();
ss.close();
}
}
Project structure:
4.Run it:
When you will run this application.You will get following output.
Hibernate: drop table User_tableAfter execution of above program,you can check User_table table in your database.
Hibernate: create table User_table (userId int identity not null, userMessage varchar(255), User_Name varchar(255), primary key (userId))
Jan 29, 2013 9:38:32 PM org.hibernate.tool.hbm2ddl.SchemaExport execute
INFO: HHH000230: Schema export complete
Hibernate: insert into User_table (userMessage, User_Name) values (?, ?)
Hibernate: insert into User_table (userMessage, User_Name) values (?, ?)
5.SQL output:
Source code:
Source:Download without jars files
Source + lib: Download with jar files


No comments:
Post a Comment